
It seems impossible, doesn’t it?
Make a potato battery and light up a bulb? That doesn’t sound right.
But yes, you can do it.
In fact, the potato battery experiment is a Science project that is used by many schools to teach kids about electricity.
If you don’t have a potato in the house, lemons are good alternatives. You can even do a test using different fruit and vegetables and see which one works better than the other. There are also science toys for sale for this particular activity.
Topics:
potato battery experiment, physics, circuits, electricity, engineering
The Potato Battery Project:
Contents
Materials
- 2 big potatoes
Fresh and juicy potatoes work best. - 4 copper coins or copper nails
If you’re using a copper coin, make sure it’s new and shiny. Old copper coins will not work as well. If you only have old ones, clean the pennies to get rid of the surface coating. - 4 galvanized zinc nails
- LED light
- wire leads
- multi meter (optional)
Step By Step Procedure
By Loadmaster (David R. Tribble)This image was made by Loadmaster (David R. Tribble)Email the author: David R. TribbleAlso see my personal gallery at Google Picasa – Own work, CC BY-SA 3.0, https://commons.wikimedia.org/w/index.php?curid=10681465
- First, cut one potato in half.
- Next, using a knife, cut a slit on one side of the potato.
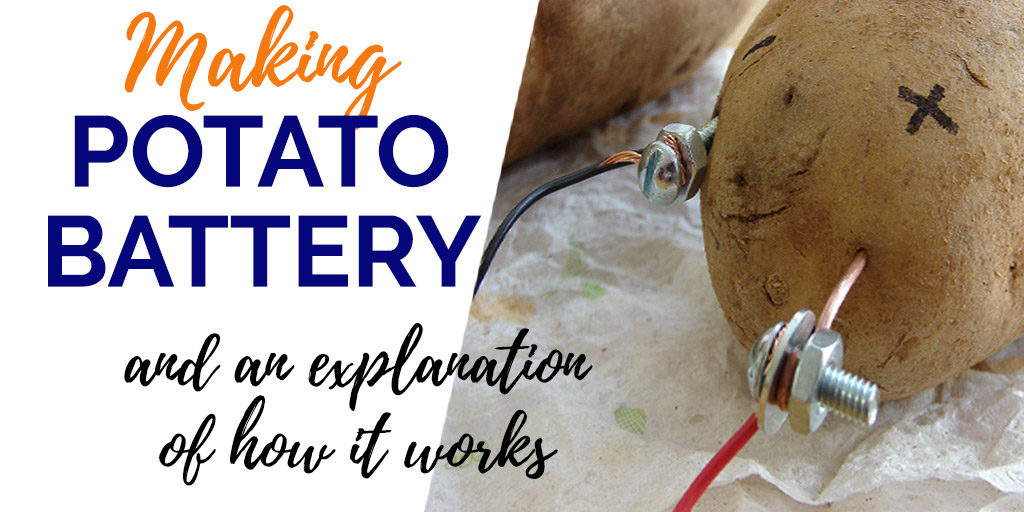
- Insert the copper coin into the potato as deep as you can but making sure that there’s still a part of the coin that’s sticking out for connecting the wires with.
- On the other side of the potato, insert the a nail. Make sure the nail and the coin don’t touch each other inside the potato.
- If you’re using a multi meter, go ahead and see how much electricity is produced by this half potato. Attach the black lead to the nail and the red lead to the coin. How much voltage does this one potato make?
- If you don’t have a multi meter, you can go right ahead and connect the two using your wire leads. Attach one lead to the nail and the other lead to the coin. Now attach the other end of these two leads to the led light. Is it working?
- If you don’t see a lot of light coming out from the led light (which is very likely), then you need to add more voltage and current by adding more potatoes into the mix.
- So let’s try and do that, shall we? Do exactly the same thing as you did with the first half potato i.e. insert the coin and the nail into each potato.
- Now what you need to do is to make a circuit. Connect the coin of the 1st potato to the zinc nail of the 2nd potato with a wire. Next, using another wire, connect the coin in the 2nd potato to the nail in the 3rd potato and lastly, connect the coin in the 3rd potato with the zinc in the 4th potato. You will then be left with an unconnected coin in the 4th potato and an unconnected nail in the first potato.
- Lastly, get your led light and connect one wire to the 1st potato and the other wire to the 4th potato. Your led light should light up now.
- You can make a higher voltage by wrapping a copper wire around the copper penny.
- Boiling potatoes for 8 minutes can produce ten times the power of a raw one.
Video: How To Make A Potato Battery
How The Potato Battery Works
It is important to take note that there is no electricity in the potato.
The potato is simply acting as a medium (or the electrolyte) for an electrochemical reaction to take place.
The potato doesn’t chemically contribute to this reaction. It’s only a bridge that facilitates the flow of electrons from one metal to another. And when there is a flow of electrons, there is electrical current.
Eventually, the metals will be oxidized and that’s when the battery runs out.
The Explanation In Video
This Science video is about lemon batteries and talks about citric acid in lemon as the electrolyte. The same thing happens with potatoes, except it is phosphoric acid in potatoes that’s causing this to happen. For more science experiment videos, subscribe to our channel on Youtube